Morphological techniques
Collecting
The best method of collecting thrips is to beat vegetation over a small plastic tray using a heavy stick. Thrips are usually sufficiently stunned initially for them to adhere to the plastic surface. Thrips can be removed with a fine brush into collecting vials, into which a small pencil written informative label should be inserted. A suitable fluid to collect into is AGA, (mixture 60% ethyl alcohol, glycerine and acetic acid - 6:1:1) (Mound & Pitkin 1972, Palmer et al. 1989).Slide preparation
Dehydration and clearing
All the species should be carefully macerated to remove the body contents.
1. Place thrips in a watch glass, replace fluid with clean 60% ethanol and store for at least 24 hours.
2. Remove the ethanol with a pipette, add a few drops of distilled water then an equal number of drops of 5% NaOH solution. Pale specimens may require only one hour, others can be left overnight, black specimens may be left for days under visual check. (Note: to accelarate this process for quick turn around time, you can place the watch glass containing the specimen and NaOH on a warming plate heated to 45°C and check periodically untill the specimen is cleared.)
3. Transfer the specimens from NaOH solution to distilled water for a few hours, then into 60% ethanol, using a wire loop.
4. Store the specimens in 60% ethanol for 24 hours.
5. Replace the 60% ethanol with 70% ethanol and leave for about 1 hour; unmacerated specimens must be punctured (middle of the abdomen is recommended) to speed the entry of alcohols.
6. Replace with 80% ethanol and leave for 20 minutes.
7. Replace with 95% ethanol and leave for 10 minutes.
8. Replace with absolute ethanol and leave for 5 minutes.
9. Replace with fresh absolute ethanol and leave for another 5 minutes.
10. Transfer to clove oil and leave for about half an hour, or until fully cleared, before mounting.
11. Place a clean cover slip onto the mounting block; put a drop of Canada Balsam onto the centre of the cover slip and into this place one thrips specimen ventral side uppermost.
12. Spread the legs and wings, and straighten the antennae by pressing and massage on the basal segments with a fine bent needle.
13. Place a small drop of balsam in the centre of a clean microscope slide, invert this and lower firmly but gently onto the specimen in balsam on the cover slip. It is recommended that you start lowering the slide from the tenth abdominal segment end so that wings and setae are pressed towards the head for clear viewing.
14. As soon as the surfaces touch, re-invert the slide with the cover slip adhered to the slide.
(see for further details: Moritz et al. 2004)
Automontage photographs
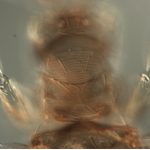
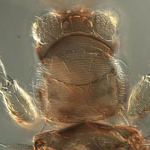
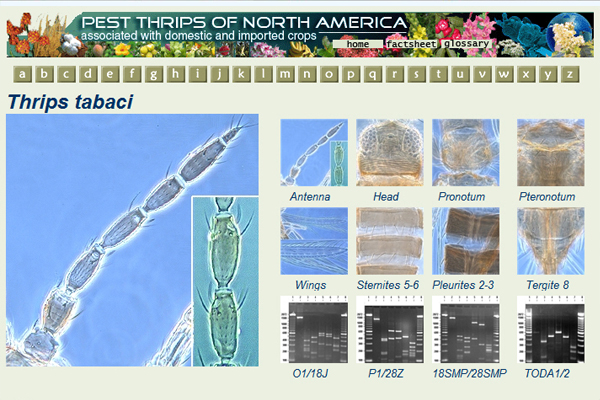
Thrips are miniature insects that must be mounted onto microscope slides in order to see their taxonomic characters. Once on slides it is difficult to view the character state of interest without adjusting the focus of the microscope. The constant adjustment of the focus is problematic when taking photos. Auto-Montage is unique in that it uses a computer to temporarily store several photos at different depths of field i.e., from the dorsal to the ventral side (Auto-Montage 2002). Once all the photos have been taken, Auto-Montage merges the temporary photos into one photo image so that all the depths of field are in focus (Fig. 1).
Morphological characters in this key are presented for each adult female thrips, i.e., antennae, ocelli, setae, head, pronotum, metanotum, mesonotum, abdomen, wings, ctenidia, and comb in color Auto-Montage images. Using Auto-Montage allows us to communicate thrips characteristics using clear three dimensional pictures (Moritz et al. 2001, 2004).
Fig. 1: Computerized images with Automontage (Syncroscopy)
The software "Automontage" (Syncroscopy) combines the most in focus regions from a series of partially focused source images.
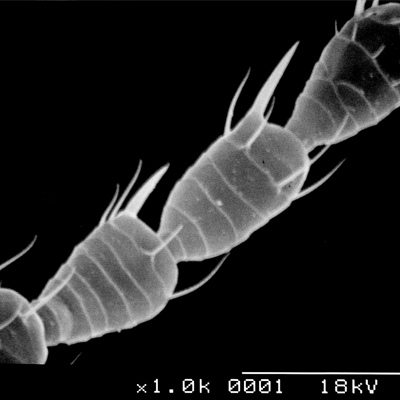
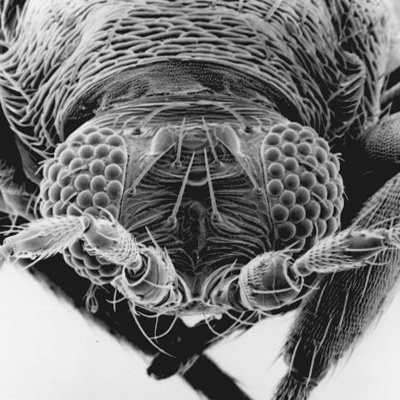
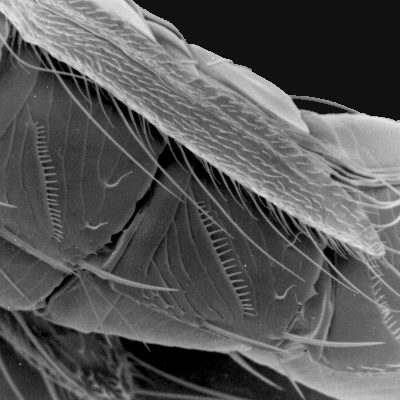
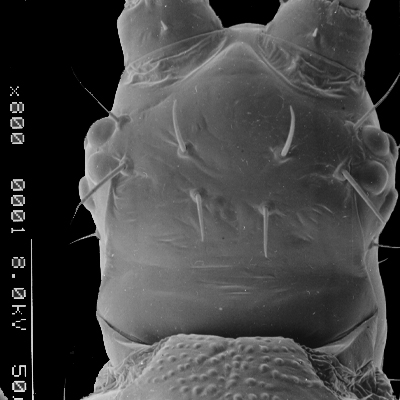
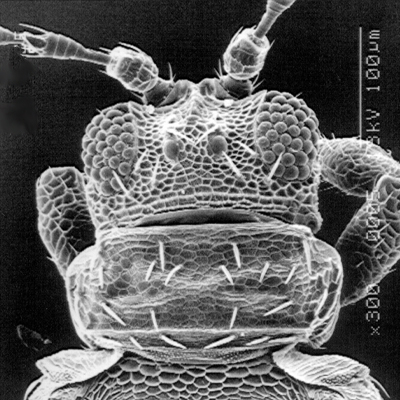
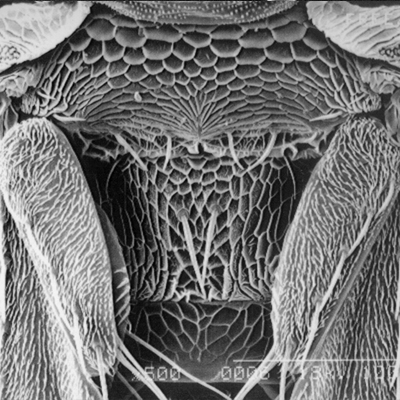
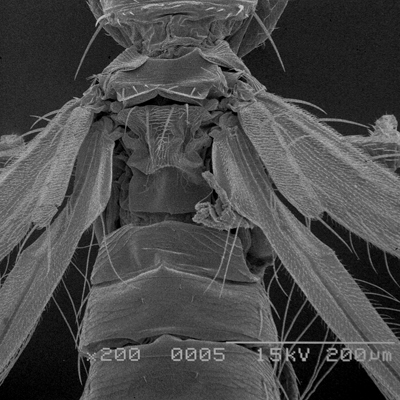
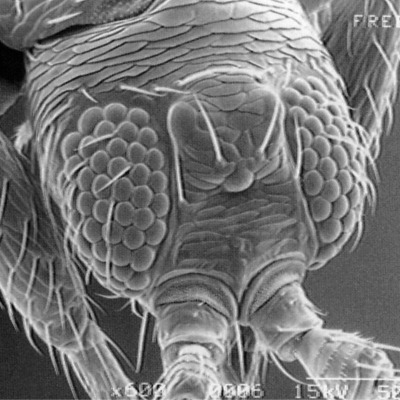
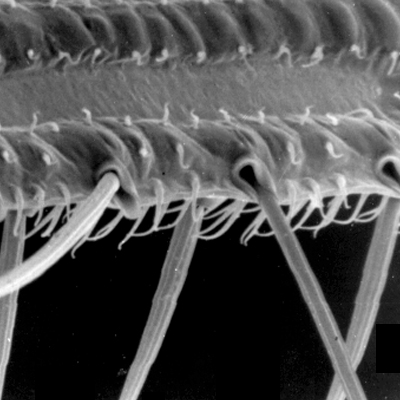
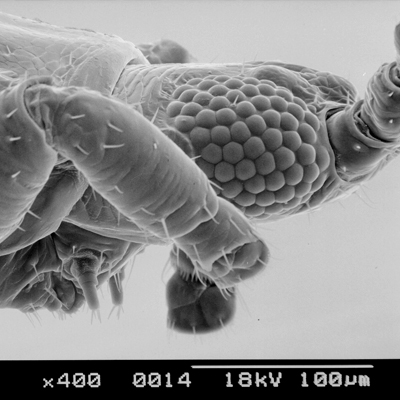
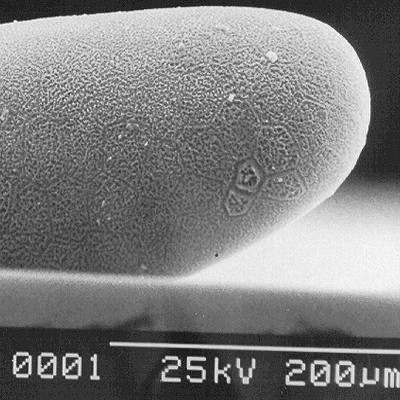
Scanning electron micrographs
Thrips specimens were dehydrated using a series of ethanol solutions of different strengths and then positioned on a scanning electron micrograph mounting disk. The specimen was then coated with a very thin layer of gold using a sputter machine and placed into the microscope’s vacuum column through an airtight door. The air was pumped out of the column and then an electron gun emitted a beam of high energy electrons which traveled downward through a series of magnetic lenses designed to focus the electrons in a very fine spot. Scanning coils moved an electron beam back and forth over the specimen row by row. As the beam hit each spot on the specimen, secondary electrons are knocked loose from the surface and a detector counted these electrons and sends them to an amplifier. The final image was built up from a number of electrons emitted from each spot on the sample. The images provide clear levels of detail and complexity and an infinite depth of focus of thrips characteristics (Fig. 2).
Fig. 2: SEM pictures of important character states (© GMoritz) (click with the mouse cursor on a picture to enlarge and information)


Molecular techniques
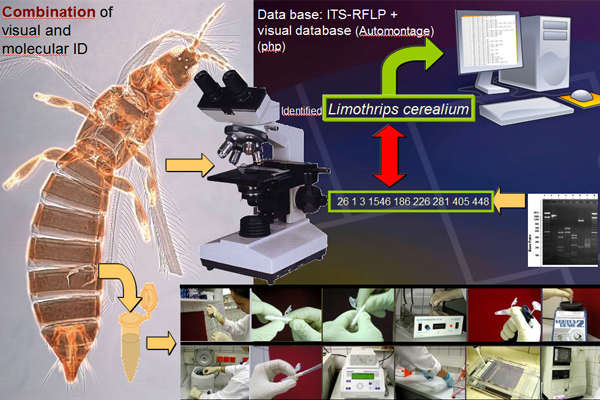
We compiled a database of ITS-RFLP molecular identification markers for eggs, larvae and adult thrips. The molecular method utilized was based on the polymerase chain reaction (PCR) using internal transcribed spacer–restriction fragment length polymorphism (ITS-RFLP) of the ribosomal deoxyribonucleic acid (DNA). This method quickly and accurately diagnoses live thrips of any life stage for those species included in the key.
Specimen acquisition
Specimens were collected and supplied to us from many areas including, the University of Hawaii at Manoa, Hawaii; Gerald Moritz, Martin-Luther University, Halle, Germany; the University of Utah, Utah; North Carolina State University, North Carolina; and the University of Florida, Tallahassee, Florida; Chile; and California. In addition, we were provided with specimens from colleagues on other continents around the world especially from Cost Rica, China, Thailand, and Guatemala, Columbia, and Puerto Rico.DNA extraction (two methods used)
1) Live eggs, larvae, or adult thrips were collected and preserved in vials of 100% ethanol for the following molecular processes. Preserved thrips specimens were transferred to a buffer to release their DNA. Eggs and larvae were ground into a PCR tube to release their DNA in an extraction buffer and then incubated in 37°C overnight. With the adult specimens, DNA extraction was conducted with the adult specimen remaining entirely intact. The specimen was placed in buffer in an eppendorf tube and heated overnight in a warm water bath of 37°C (Sunnucks and Hales 1996). Once the DNA supernatant was removed from the specimen, the remaining thrips exoskeleton was then preserved on a microscope slide and was placed in the Bohart Museum, University of California Davis, Davis, CA, USA, as voucher specimen. The supernatant was placed into a sterile tube with isopropanol and the tube was centrifuged. The DNA pellet was then washed in ethanol, dried and re-suspended in bi-distilled water and preserved in a -80°C freezer for the next step.
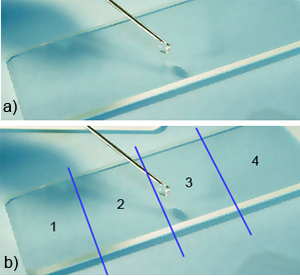
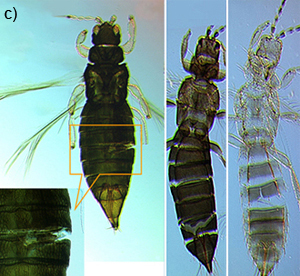
2) Extracting DNA leaving an intact exoskeleton for morphological identification (© CAO’Donnell). This method uses the Qiagen® DNeasyTissue Kit for tissue extraction but leaves the adult or larval exoskeleton intact, (eggs are dissolved and become irretrievable using this method), to use for morphological identification. Remove specimens placed 100% ethanol tubes from the -80° C freezer and place in a tube rack, (20 specimens can be done at one time with the limitations of the centrifuge). Individually remove each specimen using a sterile disposable pipette and place the specimen in a small amount of 100% ETOH from the pipette onto the sterile microscope slide (organization is critical in decreasing contamination, divide the slide into four quadrants, use both sides of the slide = 8 specimens) (Fig. 3a/b).
Fig. 3: DNA extraction leaving an intact exoskeleton (© CAO´Donnell)
Using the razor, slide the thrips dorsal/ventrally, one half way across the abdomen, see photo right (Fig. 3c). After slicing the abdomen, using the same disposable pipette, return the specimens to the 1.5 mL tubes.
Add 180 µL ATL buffer to each tube (all buffers are included in the Qiagen® DNeasyTissue Kit)
mL Proteinase K and mix by vortexing for several seconds.
Place in a water bath at 37° C overnight with the shaker on.Next Day:
Specimens are removed from the bath and bath is reset to 70° C. The samples are vortexed and 200 µL AL buffer is added and vortexed again. Specimens are then placed into the 70° C water bath and incubated for 10 min.
Specimens are removed from the water bath and 200 µL 100% Ethanol is added and the specimens are vortexed again. The supernatant and the specimen are transferred by pipette to the DNeasy mini column in a 2mL collection tube (using the 1000 µL pipette when extracting the liquid, liquid transfer amount is 600 µL, the specimens generally are pipetted with the liquid). Centrifuge for 1 minute at ≥ 6000 x g.
Discard flow-through and collection tube and place mini column into a new 2 mL collection tube. 500 µL AW1 buffer is added onto the mini column. Repeat the later step. Then add 500 µL AW2 buffer onto the mini column. Centrifuge for 3 minutes at full speed. Discard flow-through and collection tube and place mini column into a 1.5 mL Eppendorf tube (cut lid off). Pipette 50 µL AE buffer or water (pH ≥ 7.0) onto mini column. Incubate at room temperature for 1 minute. Then centrifuge for 1 min at ≥ 6000 x g. Save the flow through. Repeat the last step in the same tube. Note: do not add more than 200 µL to tube or flow-through will touch the mini column and the DNA will become contaminated. Transfer the resulting flow-through into sterile 1.5 mL tubes and place into the -80° C freezer. Retain the exoskeleton in the mini column and flow-through tube. Add 100 µL water to each mini column to re-hydrate the specimen. The specimens are cleared in this process and can now be mounted onto microscope slides in Canada Balsam following the method used in Palmer, Mound and Du Heaume (1989) omitting the maceration and dehydration steps and beginning with step no. 1 under mounting (pg. 4).PCR RFLP
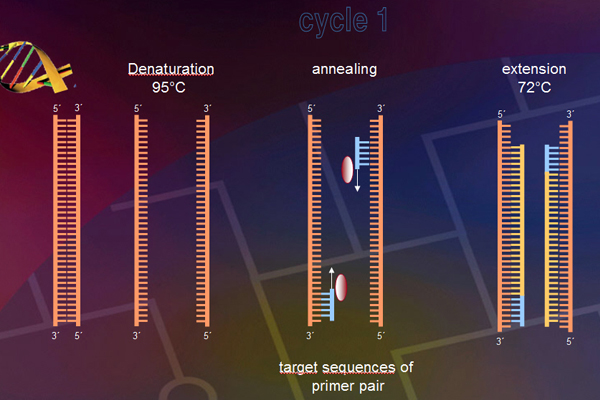
The ITS region of the genome (Fig. 4) will be amplified with primers (Table 1). The amplification was conducted in a thermocycler gradient. The DNA was initially denatured at 95° C followed by 30 cycles at 95° C, at 57° C and 72° C. The last cycle is followed by an incubation period at 72° C to complete any partially synthesized strands. The PCR product for each species was stored in a -80°C freezer for use in the next step.Electrophoresis
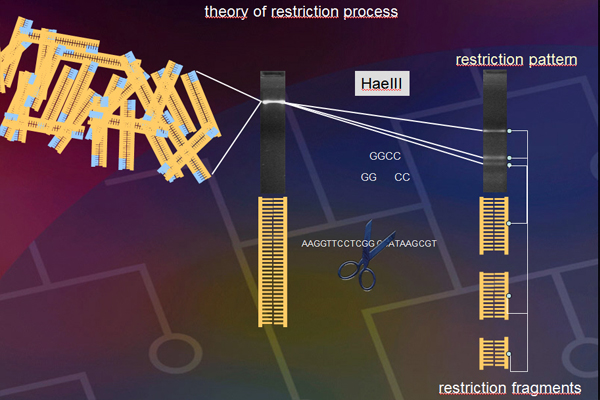
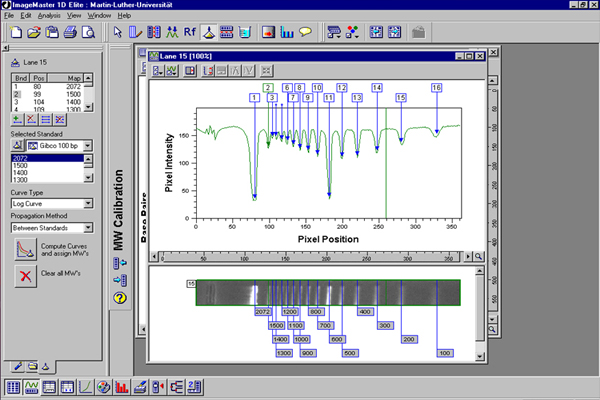
PCR-products for each thrips species were digested with the following enzymes: RsaI, HaeIII, MspI, HinfI, and AluI. They were then observed by electrophoresis in an agarose gel with ethidium bromide for visualizing the DNA restriction fragments. The gels were photographed and the band lengths were measured, recorded and stored in a computer data base to be imported into the Lucid key.
Results
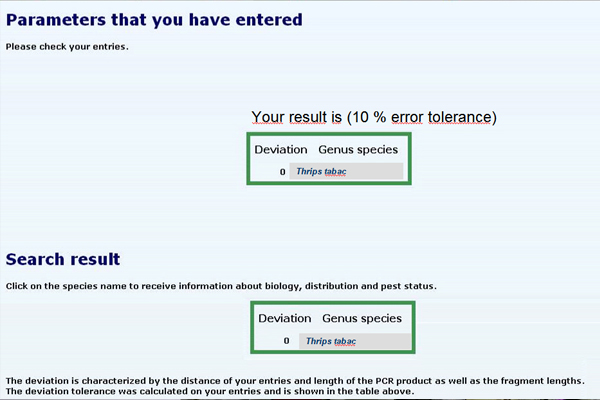
The ITS-RFLP diagnostic method utilizes an electrophoresis gel pattern of 5 enzymes, aligned in the same sequence for each species, which identifies single thrips eggs, larvae or adults (Moritz et al. 2000). Each thrips species has a unique gel pattern. This method is quick, taking approximately 24 hours to determine the thrips species collected and becomes a useful tool when faced with a damaged adult specimen, e.g. one with no antennae and is readily available for eggs or larvae, whereas morphological keys are not. This quick molecular method can be used to insure that the morphological identification of an adult is correct. The molecular data was stored in a database for ease in making updates for the authors without making costly revised editions. The database is accessible using a password that is provided to the CD ROMS owner at the time of purchase.
Fig. 4: ITS-RFLP analysis (© GMoritz)
Table 1. Primers used PCR amplification.


| Name | Sequence |
28Z |
5´ AGACTCCTTGGTCCGTGTTTC 3´ |
P1 |
5´ ATCACTCGGCTCGTGGATCG 3´ |
CS249 |
5´ TCGTAACAAGGTTTCCG 3´ |
CS250 |
5´ GTTRGTTTCTTTTCCTC 3´ |
18J |
5´ GCCTGCGGCTTAATTTGACTC 3´ |
01 |
5´ CGATCCACGAGCCGAGTGAT 3´ |
18S MP |
5´ TGAACCTGCGGAAGGAT 3´ |
| 28S MP | 5´ TCTCACCTGAACTGAGG 3´ |
| TODA1 | 5´ CGAGTATCGATGAAGAACGCAGC 3´ |
TODA2 |
5´ AATGCTTAAATTTAGGGGGTA 3´ |